

The WordPress Editor (In-depth Guide)
The Toolbar
Above The Editor rectangle, there is a toolbar containing standard tools for formatting your content. Similar to some word processing programs like Microsoft Word, the standard tools are, from left to right:

| Bold – to make text bold. |
| Italic – to put text in italics. |
| Strikethrough – to mark text as deleted |
| Bullet List – also known as an unordered list: · This is an item in a bulleted list · This is a second bulleted item. |
| Numbered List – also known as an ordered list: 1. This is an item in a numbered list 2. This is the second item in a numbered list. |
| Blockquote – used for quoting somebody in an article. |
| Horizontal line – adds a horizontal line that can separate content. |
| Justify left – align the text in the paragraph left. |
| Justify Center – align the text in the centre. |
| Justify Right – align the text right. |
| Link – insert a link to another webpage (also called a hyperlink). |
| Unlink – remove the hyperlink. |
| Insert the ‘More’ Tag – this splits the page into two parts. This may result in your website displaying the content before the ‘More’ tag and placing a “read more” link for users to click through and read the entire page |
| Fullscreen allows you to edit your page in full-screen mode, giving you greater control over your work area.
NB: See below to learn more about the Fullscreen mode |
| Toggle Toolbar – this button turns on or off the extra buttons available on the toolbar. |


Insert/Edit Link
To add a link to your page or post, highlight the word that you want to link.
Then click on the insert/edit link button.

A pop-up window will allow you to edit your hyperlink according to what page or site you want to link to.
Type the URL of the external site your want to link to and click the apply button to create the link.
If you want to link to a page or a post on your website, type the name of the page and bar and a drop down will appear which lists the matching pages. Click the relevant page or post and click the apply button to create the link.

Click on the link options button will open a popup window.
URL is where you enter the address of the website or page to where you want to link to.
The title is the title of the link. Users will see this when they hover their mouse over the link.

If you want to link to an existing page or post on your site you have two options. One is to search for the title of the page or post,

Or choose a page from the list of recent pages or posts automatically displayed at the bottom of the pop-up window.

Using the search box or choosing one of the recent pages or posts will generate the URL and title for your link.
Once satisfied with your changes, click the Save Link or Add Link button.
Fullscreen or Distraction-Free Writing Mode
Clicking the Fullscreen icon at the formatting tool will change your WordPress admin page to look like this:

To view the sidebars, move the mouse out of the editor area, and it will appear.
Distraction-Free writing will remain on till you unclick the button. This means that if you add a new page, you will be in distraction-free writing mode as soon as you start writing.
The Kitchen Sink
With the kitchen sink button turned on, the toolbar looks like this:

The following tools are now available to you, from left to right:
| Format – this option formats the selected text as a paragraph, address, preformatted, heading or sub-heading. |
| Underline – to underline text. |
| Justified – to justify text both left and right. |
| Text Color – to change the colour of the text. |
| Paste Plain Text – when clicked, this button will remove the formatting from any text that is about to be pasted.
NB: It is advisable to use this button if you are copying text from a text editor like notepad or Microsoft Word as the system will format the text into correct html for your website. Avoid pasting text directly into The Editor. |
| Remove Formatting – remove all formatting from the selected text. |
| Custom Character – this button will open a pop up dialog box allowing you to insert custom characters such as diacritics for words like café and façade as well as various currency and legal symbols.
Simply click on the symbol to insert into your page. |
| Outdent – removes the indent from the start of a line in a paragraph. |
| Indent – indents the start of a line in a paragraph. |
| Undo – this reverses, or “un-does” the last thing you did in The Editor. If you hit the undo button more than once it will undo your previous actions in reverse order. NB: You cannot undo an action once you have Updated the page or Saved it as a draft
|
| Redo – this reverses the undo, or “re-does” the last thing you un-did in The Editor. So if you hit the undo button by mistake you can re-do with this button. |
| Help – this button open a pop up dialog box with some more information on the functions of the Visual Editor |


NB: There may be additional installed buttons on your toolbar than those listed above. If this is the case, consult your developer for explanations.
Use the tools available to you in the toolbar to design your page the way you want it.
Add Media
Directly above the toolbar there are four buttons that allow you to add media to your page.

These functions are covered later in the Media section. However, there may be an image already in your page that you want to edit.
| Technical: This help module is designed more for developers and the IT department so more than likely you will not need it. All the help you need should be right here in this user's guide. |

Other media like video, audio and pdf files cannot be edited once they are inserted into a page, they must be deleted and re-inserted.
Edit Image
You can edit images to change the way they appear on your page.

To edit an image, click on the image to reveal the Edit Image and Delete Image buttons:

To resize the image simple grab one of the handles and drag the image to the desired size. The aspect ratio will remain intact.
The Delete Image button will delete the image from the page immediately.
The Edit Image button will open the following pop up dialog box:

Edit the alignment by choosing None, Left, Center or Right. You can also change the Title, Alternate Text, Caption and Link URL of the image.
There are more detailed settings under the Advanced Settings tab that may affect the way your image is displayed on your website.
NB: You should consult your web developer or IT department about whether or not to use these settings.
When you are happy with your settings, click the Update button or choose the Cancel button to cancel your changes.
Blocks:
Paragraph Block
Every page or post starts with a paragraph block. After you begin to type, you will see a toolbar appear above your text. Every block has a toolbar which contains tools which are particularly relevant to that block. The paragraph block has the following tools:

![]() Justify Center – align the text in the center.
Justify Center – align the text in the center.
![]() Justify Right – align the text right.
Justify Right – align the text right.
![]() Bold – to make text bold.
Bold – to make text bold.
![]() Italic – to put text in italics.
Italic – to put text in italics.
| Justify left – align the text in the paragraph left. | |
Insert/Edit Link
To add a link to your page or post, highlight the word that you want to make the link. Then click on the insert/edit link button.

A pop up window will appear allowing you to edit your hyperlink according to what page or site you want to link to.
Type the URL of the external site your want to link to and click the apply button to create the link.
If you want to link to a page or a post on your own website, type the name of the page and post and a drop down will appear which lists the matching pages. Click the relevant page or post and then click the apply button to create the link.

Click on the link settings button (the three dots). You now of the option to make the link open in a new tab.
Once satisfied with your changes click the Add Link button.
These are the basics of how to add content to your page or post.
Paragraph Block Sidebar
The paragraph block sidebar contains more settings for the block, which are only accessible in the block sidebar.

In the Text Settings panel, you can change the font size for the whole paragraph block. You can add a Drop Cap, which means the first letter of the paragraph will appear larger than the other letters.
The Color Settings panel allows you to change the background color of the paragraph block, and also the test color.

The Advanced Settings panel will contain options that you should consult with your Web Developer about before you make any changes.
Adding a new Block
The Return Key
If you are using a paragraph block, the easiest way to add a new block is simply by pressing the Return key on your keyboard. Another paragraph block will instantly appear below where you were writing. You can continue to write your page or post without having to do anything else.

Add a New Block From The Editor’s Toolbar
The most common way to add a new block is by clicking the plus icon on the Editor’s Toolbar.

This contains all the different types of blocks available, and they have been categorized as fol- lows:
- Text Blocks
- Media Blocks
- Design Blocks
- Widgets Blocks
- Embeds Blocks
You can also search for the block name if you already know which block you plan to use. The Most Used category will change over time to reflect which blocks you have used the most. To add the block, simply click on it and it will be added to the end of your page or post.
Add a New Block From a Block’s ‘More Options’
On every block’s toolbar, at the far right, there is always a More Options button. From here you can duplicate a block, remove a block, or Edit the block as HTML if you wish. You can also insert a new block, either before or after the current block.

By default, it will always insert a paragraph block.
Add a New Block by Inserting it Between Existing Blocks
If you are using a paragraph block, the easiest way to add a new block is simply by pressing the Return key on your keyboard. Another paragraph block will instantly appear below where you were writing. You can continue to write your page or post without having to do anything else.

Changing a Block Type
It is possible to transform an existing block into a different type of block. The kinds of block you can transform to, depend on the type of block you are using. A paragraph block can trans- form to:
- Heading Block
- List Block
- Quote Block
- Preformatted Block
- Verse Block
Clicking on the paragraph icon will allow you to see the transform options available.

Remove a Block
To remove a block, simply click on the options link, and then select Remove Block. It will be deleted. Any blocks below will move automatically upwards.

Block Types
1) Text Blocks
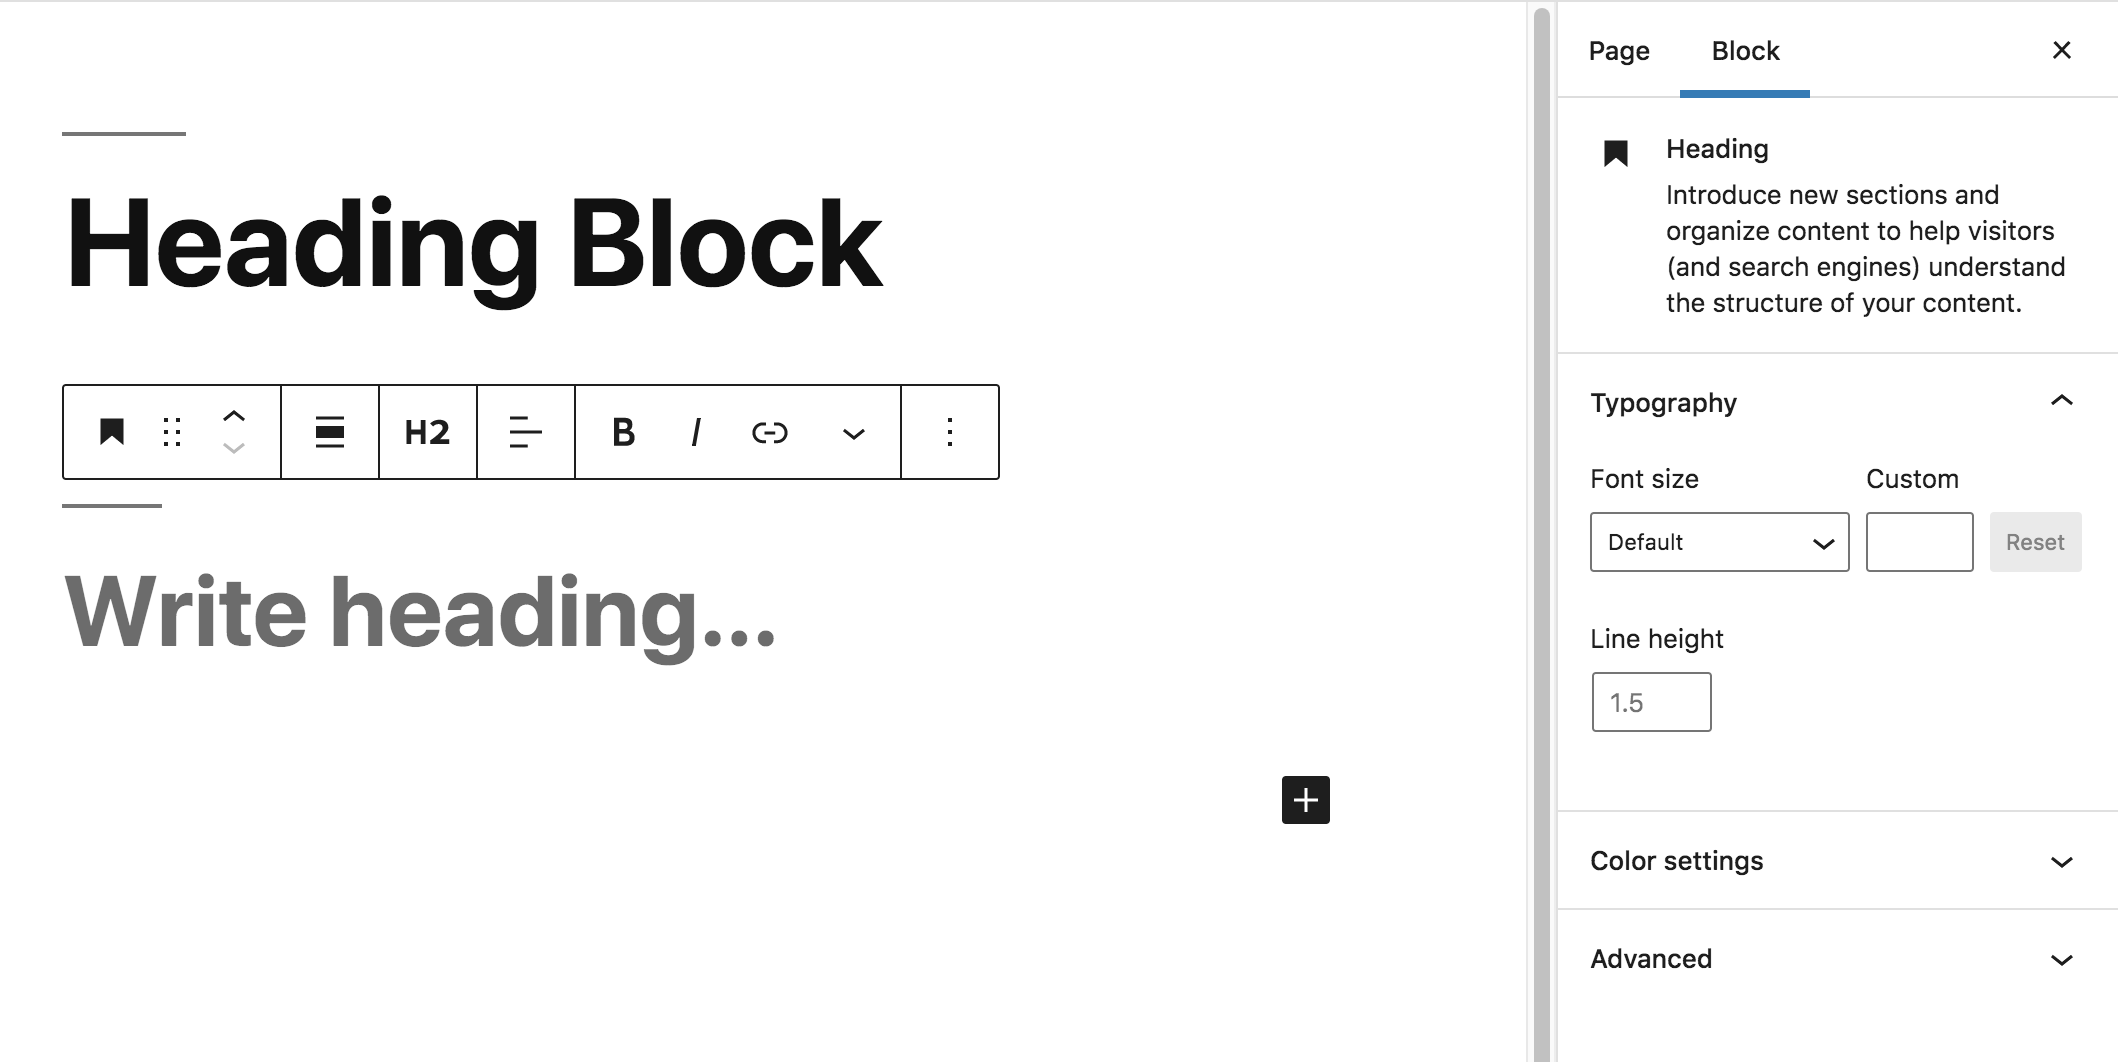
Heading Block
Introduce new sections and organize content to help visitors (and search engines) understand the structure of your content.
List Block
You can only create one type of list within the block, either bulleted or numbered. You can in- dent the list to create a sub list using the indent list item button.

Quote Block
You can add a quote and a citation. In the block Styles, you can choose between Regular and Large.

Code Block
It is unlikely you are going to need to use the Code Block, as it for displaying code snippets on your page or posts.

Classic Block
If you have used an older version of WordPress you will be familiar with the classic editor, and the Classic Block allows you to recreate the old editor.

Preformatted Block
Preformatted blocks are very similar to code blocks. The main difference is that they do not use the HTML element, and have slightly different styling options.
<img src="https://vum.s3.amazonaws.com/wp/manual/5-7/0309/en/new_editor/formatting_preformatted.jpg" alt="Preformatted Block" width="600" style="margin-bottom: 20px;">
<br>
Pullquote Block
A Pullquote is similar to a normal quote however it is usually used to quote your own article. It is used to add more emphasis to a quote.
You can change the main color and the text color of a pullquote.

Table Block
When you first add a table block, you will be asked how many rows and columns you wish to add. Don’t worry you can change the table at any time in future, but in order to first see the table, you need to click the Create button.
You will now see your table with empty table cells.
You can format the contents of the table cells using the toolbar. If you want to change the alignment of a cell, it will change the alignment of the whole column rather than just a single cell.
The Edit Table icon in the center of the toolbar allows you to:
- Add Row Before
- Add Row After
- Delete Row
- Add Column Before
- Add Column After
- Delete Column
You can not delete the table from this toolbar; if you want to do that you will need to delete the Table block, which is available in the More Options.
In the Table Block settings, you can select a Striped style, which will make the odd rows a grey color.
You can also make the table cells a fixed with, meaning that the width will not grow any larger or smaller based on the content you add to the cell.

Verse Block
The verse block is used for writing poetry. It will display all spaces and line breaks exactly as you enter them. The paragraph block will format the spaces and line breaks automatically, which is perhaps not what you want.

2) Media Blocks
Images Block
If you want to add a single image to content, use the Image Block. You can either:
- Upload – Upload an image directly from your computer
- Media Library – Choose an image from your media library
- Insert for URL – Paste in the URL of an image (usually from an external website).
Once you have inserted an image it will look like this:

Resizing the Image
There are number of ways you can resize the image. The easiest way is using the Image Dimen- sions which appear in the block settings. You can either select 25%, 50%, 75% or 100%. Or if you want to be very specific you can type the number of pixels in the width or the height. It will automatically maintain the image’s aspect ratio, so if you add a height number, the width number will change automatically. You can also select from the Image Size dropdown, as this may contain specific predefined im- age sizes you use for your website.
Finally, you can use the blue circles that appear to the right and the bottom of the image. This allows you to drag the image. This may be useful if you are trying to wrap text around the im- age.
Alt Texts and Captions
You can add a caption directly below the image which is useful if you want to describe an im- age. You should be adding Alt Text (Alternative Text) to all of your images which will be used to describe the image for people who can’t see it. It can also be useful for Search Engine Opti- mization.
Link Settings
You can change where the image links to by choosing from the dropdown. It is fine to leave this as none, or you may want it to link to the Media File.
Changing the Image
To change the image, click the Edit Image icon in the toolbar.

From here you can select another image from your image library. If you want to actually edit the image, to crop it for example, you can click the Edit Image link in the Attachment Settings. This functionality is covered later in the manual.

Remove Image Block
If you need to delete an image, you do so by removing the image block.

Gallery Block
To add multiple images to your page or post, use the Gallery Block. The Gallery block is not limited to using just images, it can use any type of media.
When you add the Gallery block, you can either upload images from your computer or you can select them from your Media library.
Select the images you want to appear, and a tick icon will appear next to them. If you change your mind, you can deselect them by clicking on them again. Or you can use the Clear link in the bottom left hand corner.

When you are ready, click the Create New Gallery button in the bottom right hand corner.
You can now Edit your Gallery. You can reorder the images by dragging and dropping them into the order your prefer. If you have changed your mind, you can delete the images by click- ing on the remove icon. You can also add a caption to each of the images.

Now click Insert Gallery. The gallery will now appear in your content.

In the block settings, the number of columns will match the number of images you have in- serted.
By default it will automatically crop the thumbnail images to fit the space and make them ap- pear aligned with each other. This does not crop the full image, only the thumbnail image. You can turn this off if you prefer.
As with the image block, you can change where the images link to.
Audio Block
You can embed a simple audio player on your page or post. After you have added the Audio Block, you then need to choose an audio file for it to play. You can either upload an audio file, or select one from your media library. To change the audio file, click on the pencil icon.
In the Audio Settings you can set the audio to Autoplay (this may not work in all web brows- ers), and you can set it to Loop.
If you select the Preload None, the track duration will not display until you hit the play but- ton. This may not be the best user experience for visitors to your website.
Preload Auto means the audio will be loaded entirely when the page is loaded. This might be unnecessary if most of your visitors will not listen to the audio.
Preload Metadata will use the metadata contained in the audio file to display the track in- formation without loading the audio.

Cover Block
A Cover block is an image or video with a text overlay. If you want to add a heading to your page or post, consider using a Cover block to make it more interesting. To change the media, click the pencil icon.
You can change the cover settings to be a fixed background. This gives the effect of the text moving over the background when you scroll up or down.
You can also change the overlay color and opacity. By default, it is set to black and at 50.

File Block
Use the File Block if you want to provide a link to download a file like a PDF. After you add a file block, you then need to select the file from your media library or upload a new file.
In the Text Link Settings you can link it the Media File (recommended) or the Attachment Page. You can also make the link open in a new browser tab.
By default, WordPress will add a Download Button. You can turn this off if you prefer.

Media & Text Block
If you want to add two columns, with media in one column and content in the corresponding column, then this block provides a simple way of doing this.
The content will appear in a larger font-size, when compared to paragraph text.
You can switch the content and text around using the blocks toolbar.
In the media’s block settings, there is an option to “Stack on mobile”. This means that when a user is visiting your page on a mobile device, the image will appear above the content, or vice versa.

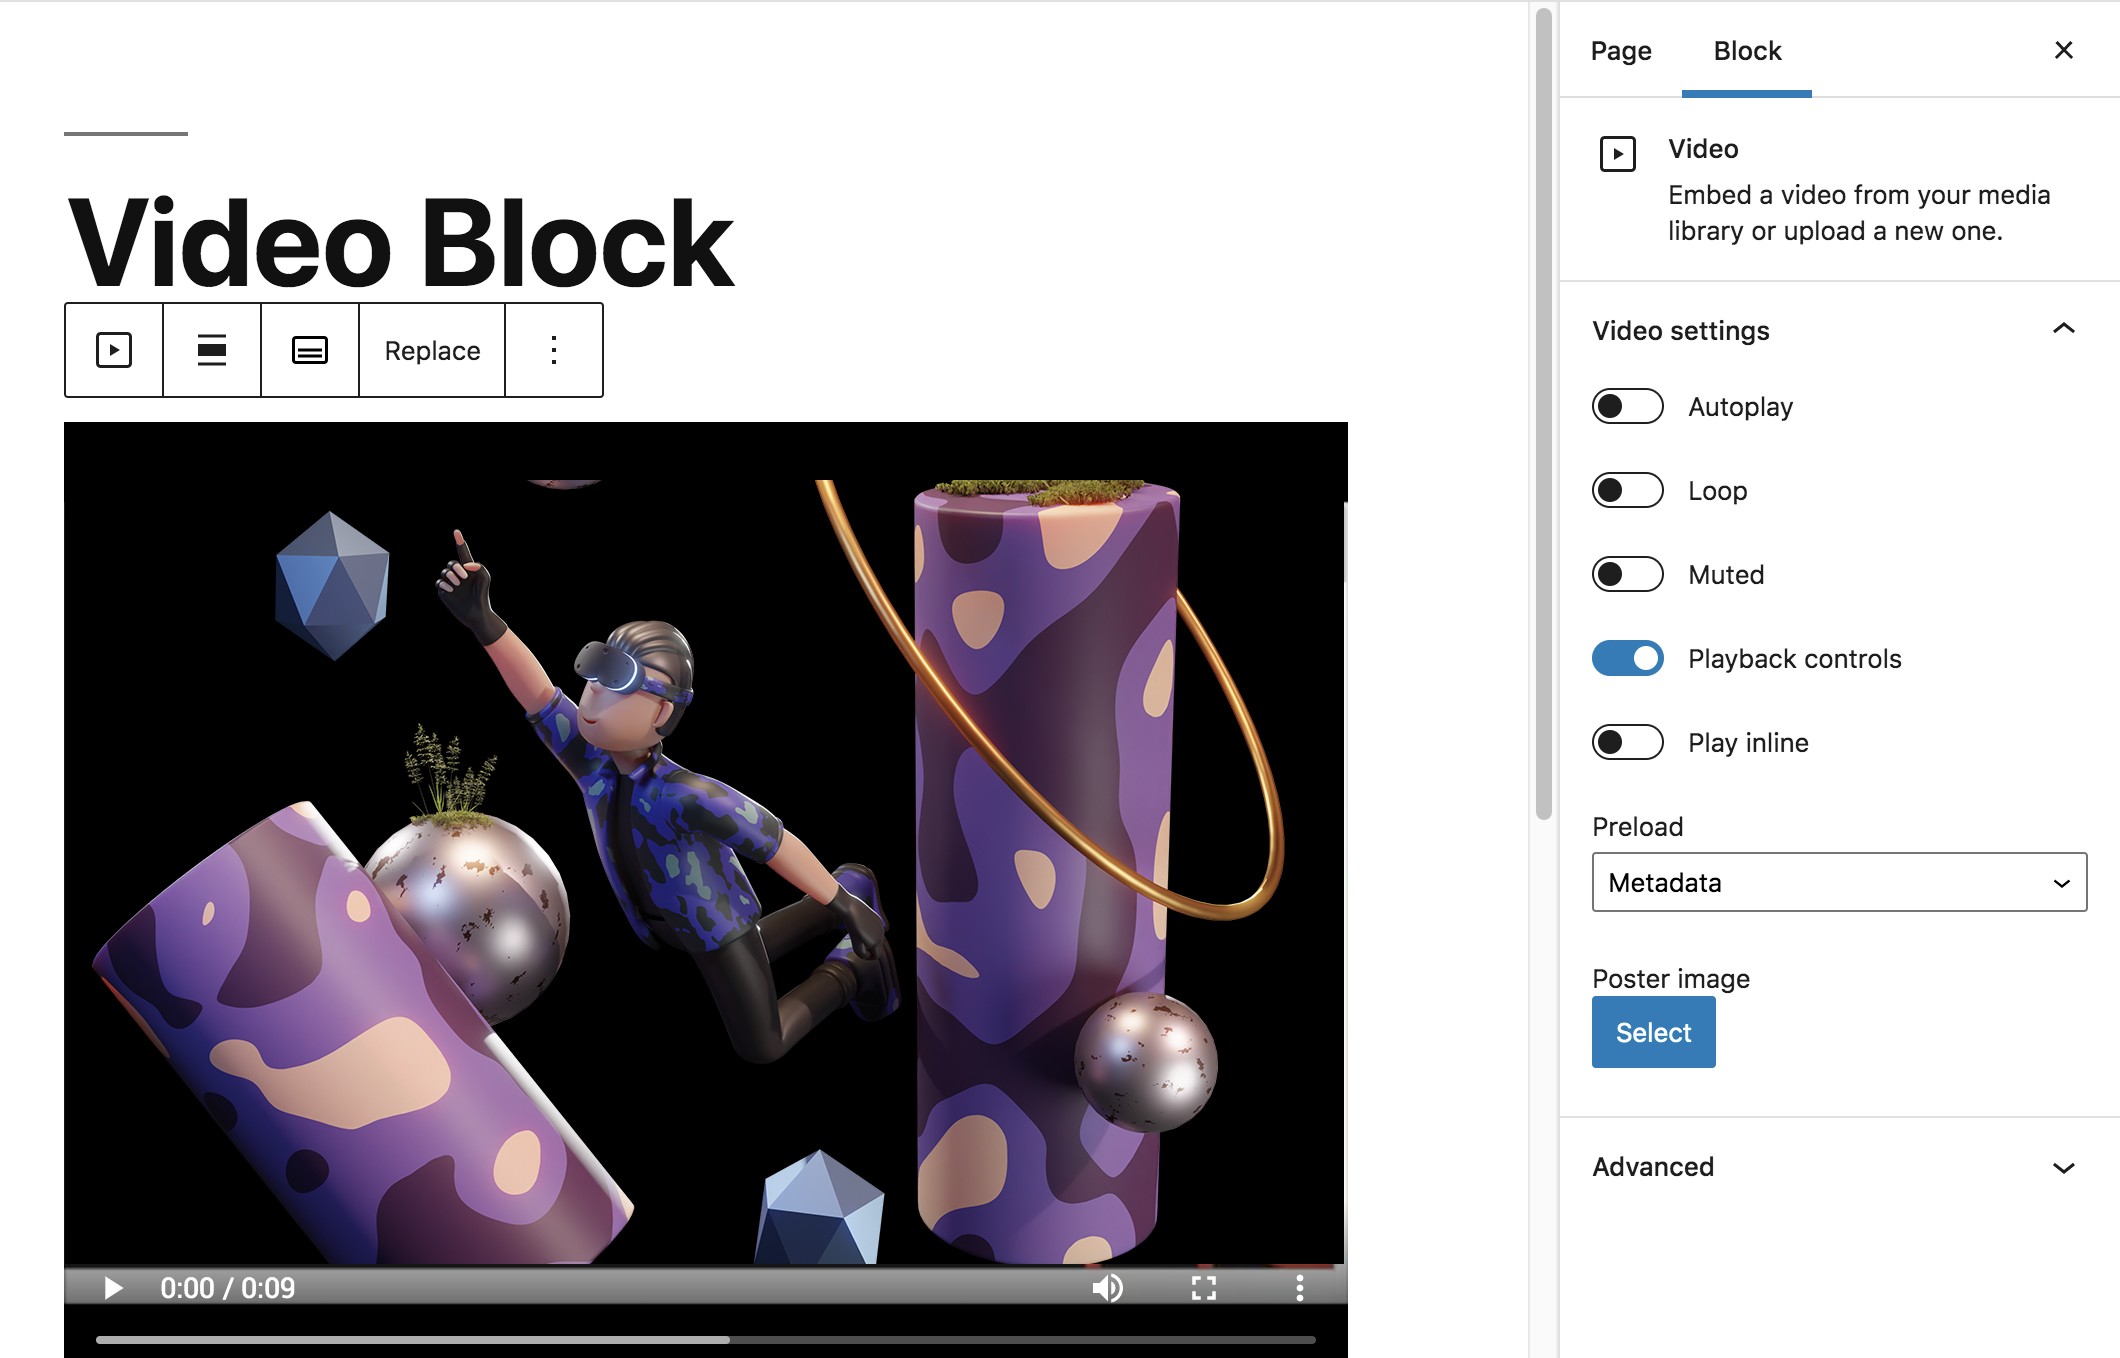
Video Block
You can embed a simple video player on your page or post. After you have added the Video Block, you then need to choose a video file for it to play. You can either upload a video file or select one from your media library. To change the video file, click on the pencil icon.
In the Video Settings you can set the video to Autoplay (this may not work in all web brows- ers). You can set it to Loop the video. You can Mute the video, so by default it would play without a sound. You can also toggle the Playback Controls.
By default, it will be set to Preload Metadata. This means the video player will use the metadata contained in the video file to show how long the video is to the visitor.
Preload Auto will load the entire video when the page is loaded. This is not recommended. Preload None will not display any video information till the visitor clicks the play button.
Preload None will not display any video information till the visitor clicks the play button.
Poster Image will replace the video with a background image. This can be useful if you want to create a specific thumbnail image to represent your video.
3) Design Blocks
Button Block
The button block can be used when you want to prompt a user to take action. You first need to add the text that will appear on the button. Then add the URL of the location where you want to take the visitor.
In the block settings, you can change the style or the block. You can also change the back- ground color and the text color.

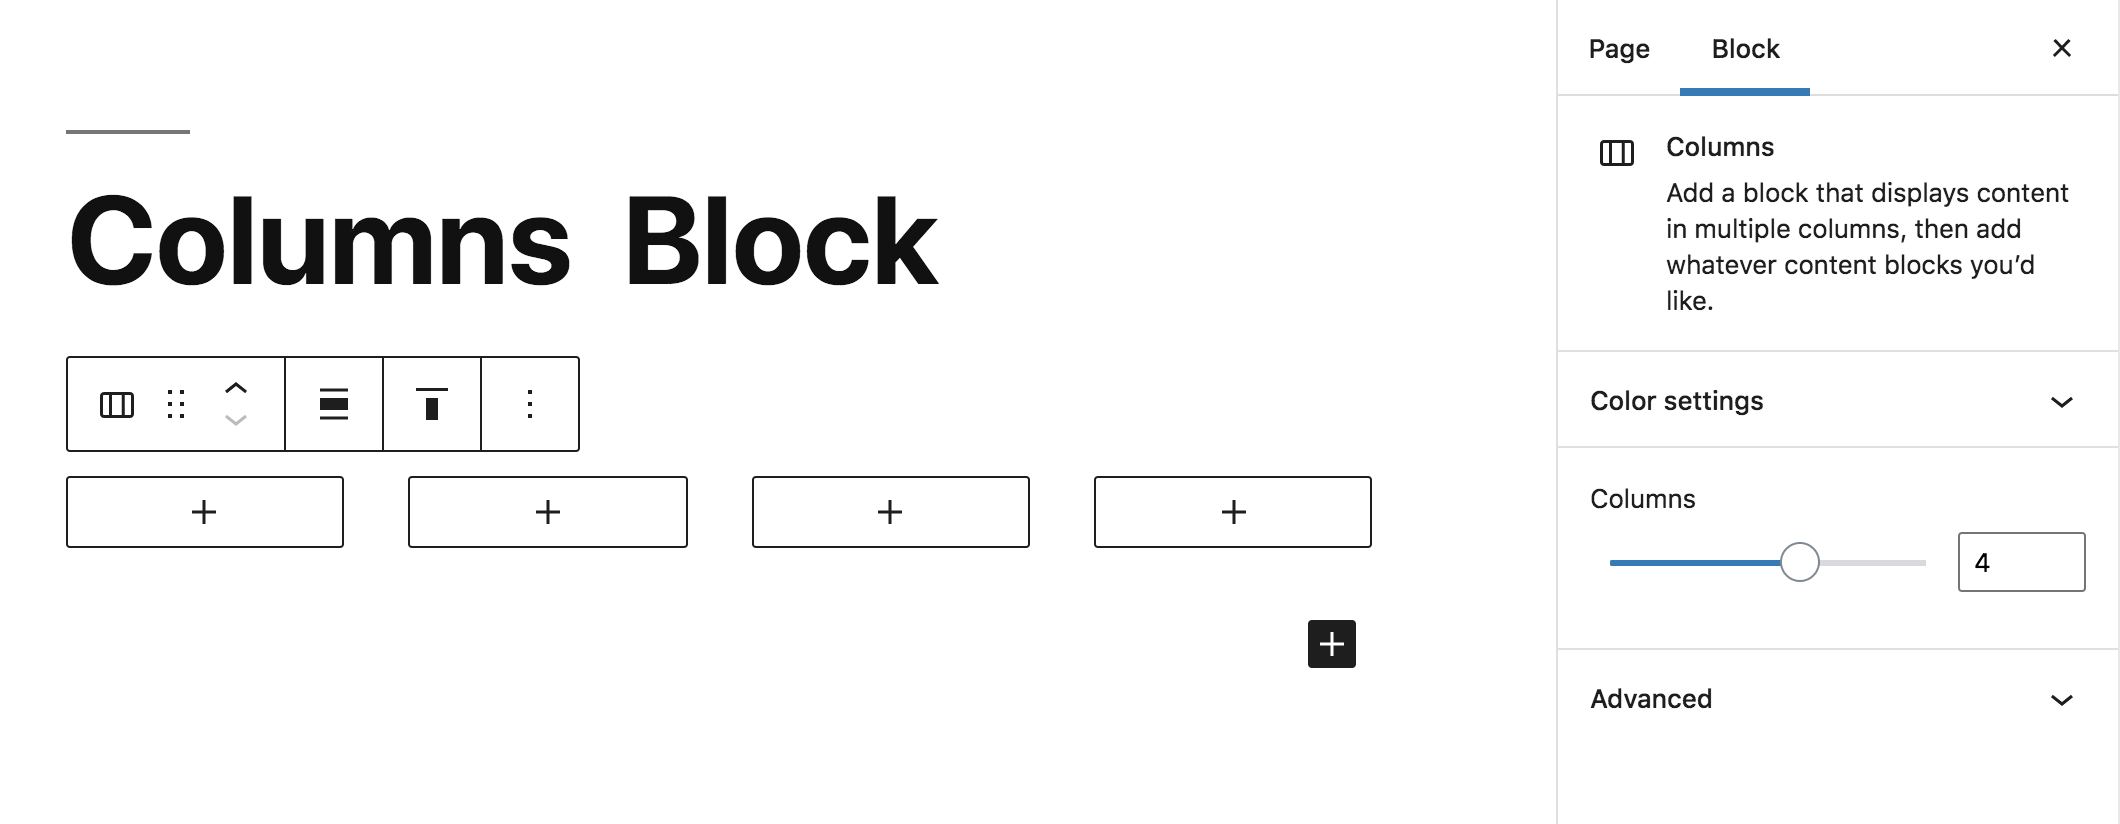
Columns Block
The column block allows you to display content in multiple columns. When you first add the block it will show 2 columns. If you wish to have more columns, go the block settings and change the number of columns.
More Block
If you only want an excerpt of your blog post to appear, then you need to add a More Block, to mark where that excerpt ends. Any content before the more block will be shown in your ex- cerpt on your archives page.
You can edit the text that says Read More and change it to whatever you wish.
When a visitor is reading your full post, the More block would not be visible.
It is possible to hide the teaser in the block settings. This means that the excerpt would not appear in the full post. This is not recommended as it assumes that the person has already read the excerpt. If they have not, they will most likely be confused.

Page Break Block
If you want to separate a page or post into multi-pages you can use the page break block. This allows you to edit all the content in the one place, but by adding in page breaks, the visitor will experience the content on multiple pages. You can add as many page breaks as you like.

Separator Block
A separator will create a horizontal break in your content. This can be useful when you want to emphasize different types of content.
In the block settings you can change the style to be:
- Short Line
- Wide Line
- Dots

Spacer Block
If you want to add some white space between your blocks to make you page look a bit nicer, try using the separator block. You can select the height of the white space by either dragging the blue circle, or typing the pixel height in the settings.

4) Embed Blocks
All embed blocks, YouTube, Facebook etc., work in exactly the same way. Choose the type of embed block you want to include in your content; in this example we are going to use YouTube.
Paste the full YouTube URL in to the field, and then click Embed. The YouTube video will appear in your page or post.
All the other 30 embed blocks, work in exactly the same way.

Keyboard Shortcuts
You can create headings and lists without having to use the editor toolbar. For a heading, all you have to do is simply type in the editor:
## This is a sample heading
This will create a heading one (the largest heading). To create a subheading, for example - a heading three, just type:
### heading three
#### heading four
##### heading five
To create a numbered list all you need to do is type:
1. first item
2. second item
3. third item
The editor will automatically change this to be a numbered list.
To create a bullet list simply type:
* first item
* second item
* third item
The editor will automatically change this to be a bulleted list.
Views
View Options
Click on the Show More Tools and Options icon in the editor toolbar and it will expose new menu options which allow you to customize how the edit page is arranged.

View – Top Toolbar
Selecting this option will place the toolbar permanently at the top of the editor. The toolbar will change depending on which block you are using.

View – Spotlight Mode
Selecting this option will mean that only the block which is in focus will be visible, the other blocks will fade into the background till you click on them. This can be useful if you want to focus on blocks individually.

View – Distraction-Free Writing Mode
Clicking the Full screen icon at the formatting tool will change your WordPress admin page to look like this:
